How to Lace Hiking Boots
You’ve been tying your shoes the same way for years, probably since childhood. It’s second nature now, a simple loop and pull before heading out the door. But when it comes to lacing up your hiking boots, you might want to rethink your approach. A properly laced boot isn’t just about keeping it snug; it can make or break your hiking experience by preventing blisters, alleviating pressure points, and giving your feet the support they need on rugged terrain.
Many hikers struggle with foot discomfort, and the root cause often lies in improper lacing. Maybe your boots feel too tight in some areas, too loose in others, or your heel slips no matter how snug you think they are. That’s where alternative lacing techniques come into play. By adjusting your lacing method to fit your foot shape and hiking conditions, you can make each step more comfortable and prevent pain before it starts.
Thanks to the team at REI, below are three different lacing methods for more comfortable feet while avoiding pesky hot spots which eventually lead to blisters.
Why Lacing Matters More Than You Think

Your foot isn’t a uniform shape, it has curves, pressure points, and areas that need more support than others. A one-size-fits-all lacing technique won’t work for everyone. For example, hikers with high arches often experience pain on the top of their foot, while those with wide feet may struggle with pinching near the toes. And if your heel slips, even slightly, you’re on the fast track to painful blisters.
Lacing techniques aren’t just about comfort, either. The right method can also provide more stability on challenging trails. Steep inclines, loose terrain, and long descents all demand different levels of foot security, and your lacing style should adapt to the conditions.
Three Game-Changing Lacing Techniques
To help you get the best fit, we’ve gathered three tried-and-true lacing techniques that can solve the most common hiking boot problems. These methods come recommended by outdoor experts and can be a game-changer for anyone who spends long hours on the trail.
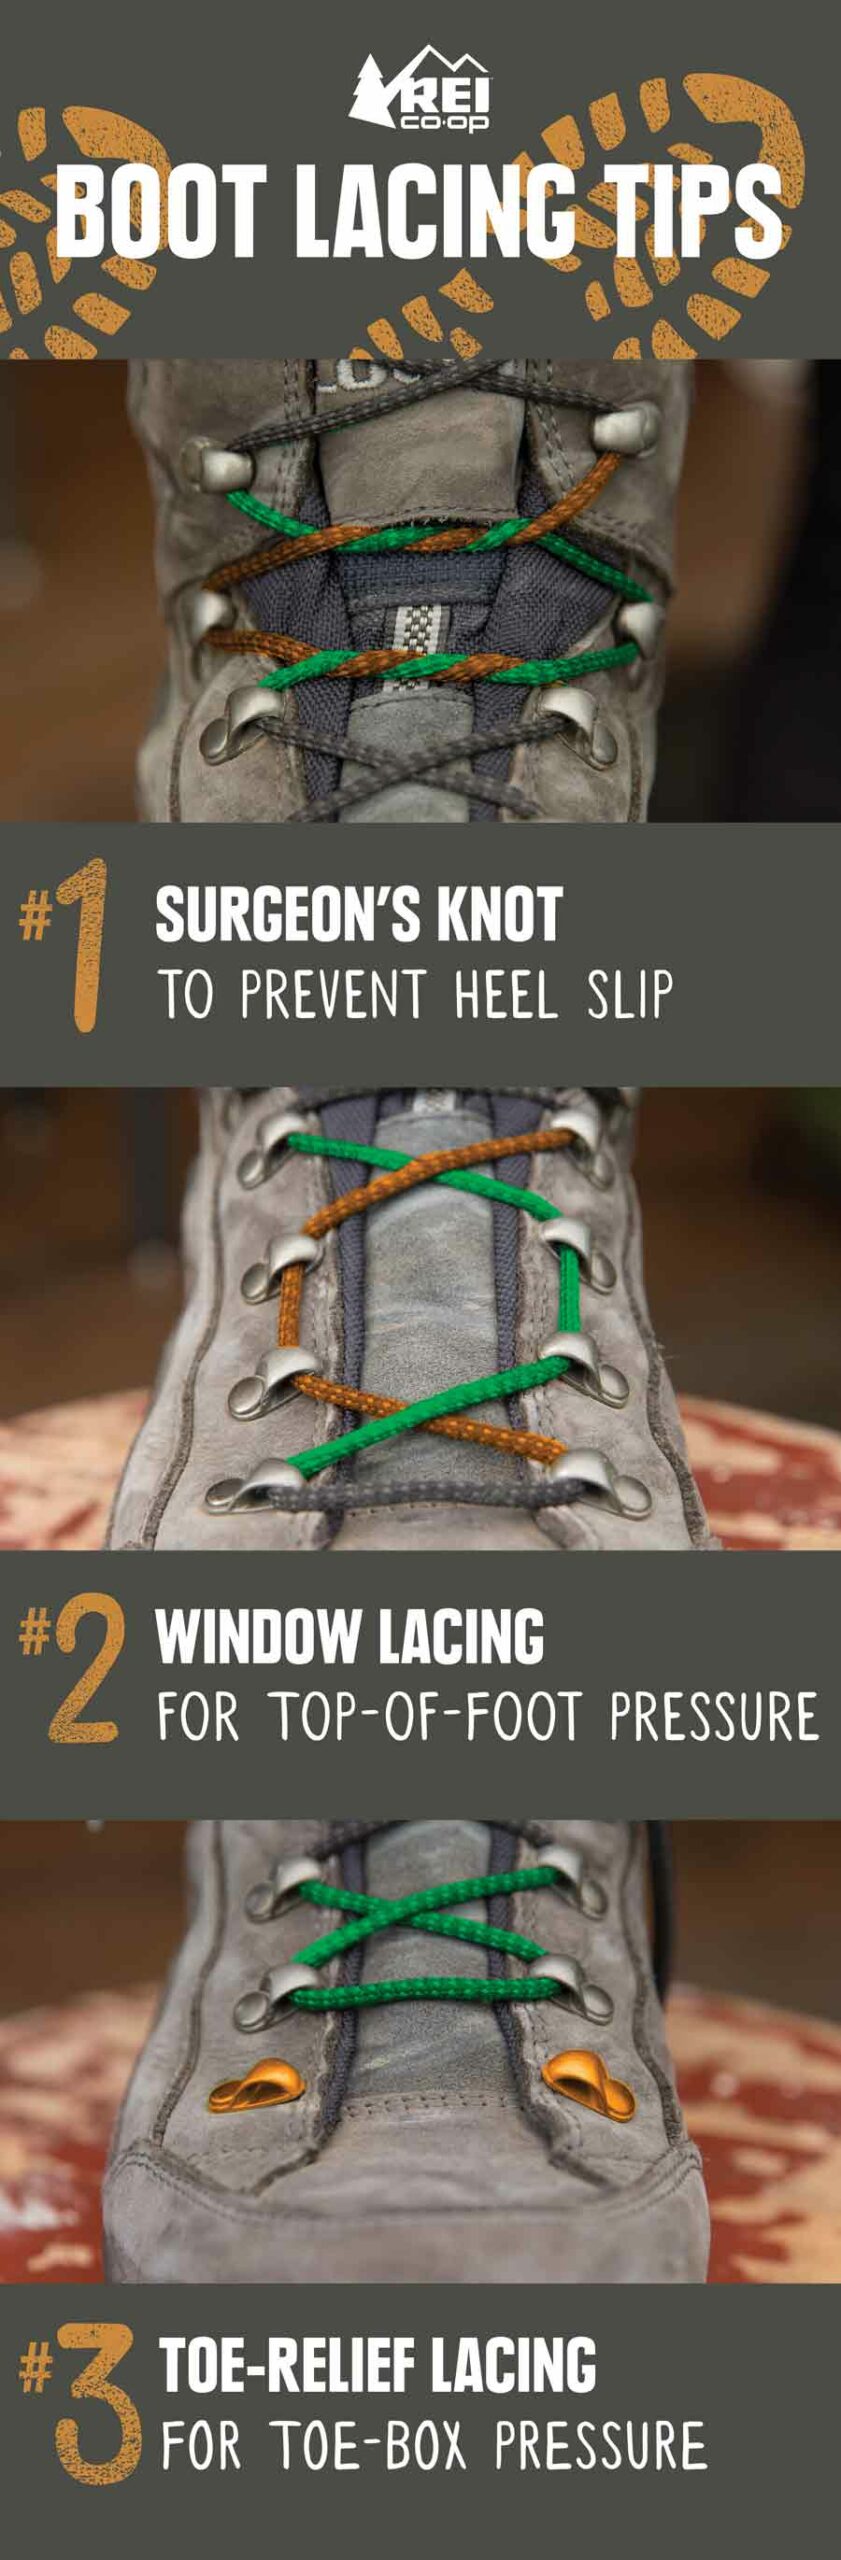
1. Surgeon’s Knot: Lock Your Heel in Place
Best for: Preventing heel slippage and reducing blisters
Heel slippage is one of the biggest culprits behind blisters. If your foot moves too much inside your boot, friction creates painful hot spots. The Surgeon’s Knot helps lock your heel in place by creating extra tension where you need it most.
How to do it:
- Lace your boots as usual until you reach the eyelets just below your ankle.
- Instead of crossing your laces as normal, wrap them around each other twice before pulling tight to create a knot.
- Pull the knot firmly to keep tension, then continue lacing up the boot.
- Repeat at the next set of eyelets for added security.
This technique keeps your foot from shifting forward or lifting at the heel, reducing friction and preventing blisters before they start.
2. Window Lacing: Relieve Pressure Points
Best for: Reducing top-of-foot pain caused by high arches or tight boots
If you’ve ever felt a sharp pressure point on the top of your foot while hiking, window lacing (also called “box lacing”) can help. This method relieves pressure by giving your foot a little extra breathing room where it needs it most.
How to do it:
- Lace your boots normally until you reach the pressure point.
- Instead of crossing the laces, skip an eyelet on each side to create a gap (or “window”).
- Resume lacing as usual above the skipped section.
By skipping an eyelet, this technique reduces direct pressure on tender spots without sacrificing overall boot security.
3. Toe-Relief Lacing: Extra Space for Your Toes
Best for: Relieving pressure in the toe box, especially on long descents
Downhill hiking can be brutal on your toes. With each step, your foot slides forward, jamming your toes into the front of your boot. This can lead to bruised toenails and serious discomfort. Toe-relief lacing helps by loosening the forefoot while keeping the rest of your boot snug.
How to do it:
- Start lacing as usual but leave the lowest set of eyelets unlaced.
- Continue lacing up the boot, ensuring the midfoot and ankle remain secure.
This method allows your toes more freedom to move while maintaining the necessary support higher up in the boot.
Additional Tips for the Perfect Fit
While these lacing techniques can improve comfort, they’re only part of the equation. Keep these tips in mind to get the most out of your hiking boots:
- Start with the right fit – No lacing trick can fix boots that are too small or too big. Make sure your hiking boots fit well before relying on lacing techniques for adjustments.
- Use quality laces – Thicker, durable laces provide better security and prevent slipping throughout your hike.
- Adjust throughout your hike – Your feet swell over time, so be prepared to loosen or tighten your laces as needed.
- Pair with proper socks – Moisture-wicking, cushioned hiking socks can make a huge difference in overall comfort and blister prevention.
- Break in your boots – Even the best-laced boots won’t be comfortable if they’re brand new. Wear them on shorter walks before hitting long trails.
Lace Up and Hit the Trail
Don’t let foot pain ruin your next adventure. By choosing the right lacing technique for your needs, you can enjoy more comfortable, blister-free hikes. Experiment with these methods to see what works best for your feet and the terrain you’re tackling. A little extra effort when lacing up can go a long way in keeping you on the trail longer, pain-free, and ready for the next summit.
This is my first time pay a quick visit at here and i am really pleassant to read all at one place.
https://waterfallmagazine.com
Fantastic site. A lot of useful info here. I am sending it to several pals ans
also sharing in delicious. And naturally, thanks on your sweat!